
Private
Project Type
Furniture
Date
October 2024
Skills
CAD, Sketching, Rendering, Woodworking, CNC Machining, User Research
A sleek desk organizer that is designed to be flat-pack, easy to assemble, and use no screws or dowels. Made out of Russian birch plywood, all components were cut from a singular 4'x4' panel. This desk piece was designed with a fellow classmate client's wants and needs in mind. The topmost shelves dedicate space for displaying past models and works, while the bottommost are designed to store paper, rulers, and triangles. The middle shelves contain dedicated slots for marker sets, scissors, pens, and more, while also containing a drawer for storing miscellaneous items. The center plank not only stabilizes the entire body but provides a laptop stand to help alleviate stress on the neck and back. The back covers are removable for those moments when you need to concentrate on your own work or open up and collaborate with those around you.
User Research
For this studio project, we were given another studio member as our client. The first step in this process was to research our client and identify their needs. My client also requested specific features, such as a place to display past projects, a spot for their laptop, and storage for their specific markers. I started by taking inventory of their current storage solution, a trunk. I catalogued every single item, and combined with feedback from the client, created three how might we questions:


An itemized list of everything contained in the client's storage.
A picture of how cluttered the client's storage was prior to this project.
How Might We...
-
Make storage and retrieval of items easily accessible?
-
Be able to display past projects elegantly?
-
Incorporate a system that can help organize small objects?
Initial Concepts


Initial thumbnail sketches.


We were specifically instructed to create iterations by doing thumbnail sketches over a base concept.
First Design
After narrrowing down different interations, this was the first design that became a prototype. Constructed out of OSB, the prototype gave valuable information about size, stability, and form. The main issues with this design was lack of support; it would constantly be bending and shifting even without any added weight.

Thumbnail sketch with dimensions.
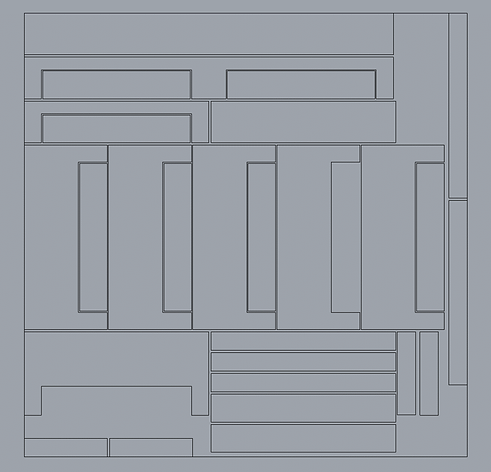
One of the main challenges of this project was ensuring that the desk organizer could be made from a single 4'x4' panel. Here are all of the pieces laid out to ensure they meet the requirements.
Refining

The initial model for the final design.

The final CAD model. While the final model looks very different, the silhouette of the two remains nearly identical.
After learning from the previous prototype, several changes were made. The form was streamlined, retaining core features while visually improving the design. Afterwards, the final design was created. In order to remain flat-pack and not utilize hardware, pieces are slotted together. The central horizontal board was changed to be a single board, greatly improving the structural support. These two completely removed the issue of bowing. This model contains key features, such as a drawer for small items, specific cutouts for markers and tools, space for a laptop and displaying projects, removable backplates for focus or social modes, and discrete storage for paper and rulers.

Orthographic views of the final model.
CNC

The entire organizer was CNCed out of Russian birch plywood. Each piece had to be laid out, ensuring there was ample space between pieces for tool thickness. While most pieces could be cut straight out, some pieces had to be CNCed a second time to cut out pockets. Additionally, some pieces had to be split into multiple parts to ensure that it would fit on the pattern.


The final product after being CNCed, sanded, and assembled. Here you can see the client utilizing the different features: displaying projects, storing specific objects like markers and glue, and storing paper, guides, and rules underneath.
Post-Project


One of the requirements after the project was creating an instruction booklet that clearly illustrated the assembly process without the use of written instructions. Note that the layout is indended for saddle-stiched booklets.


These are some renders complete after the project and semester ended. Rendered in Rhino 7, this was my first time creating a render for a product.